I have held off writing a post about How I Make Bone Broth, because I’ve been pretty sure that when I make broth, I just throw bones in water and boil ’em. Doesn’t exactly seem recipe worthy. But then I post pictures of what is basically beef or chicken jello, and get comments suggesting that a lot of people don’t have the same results.
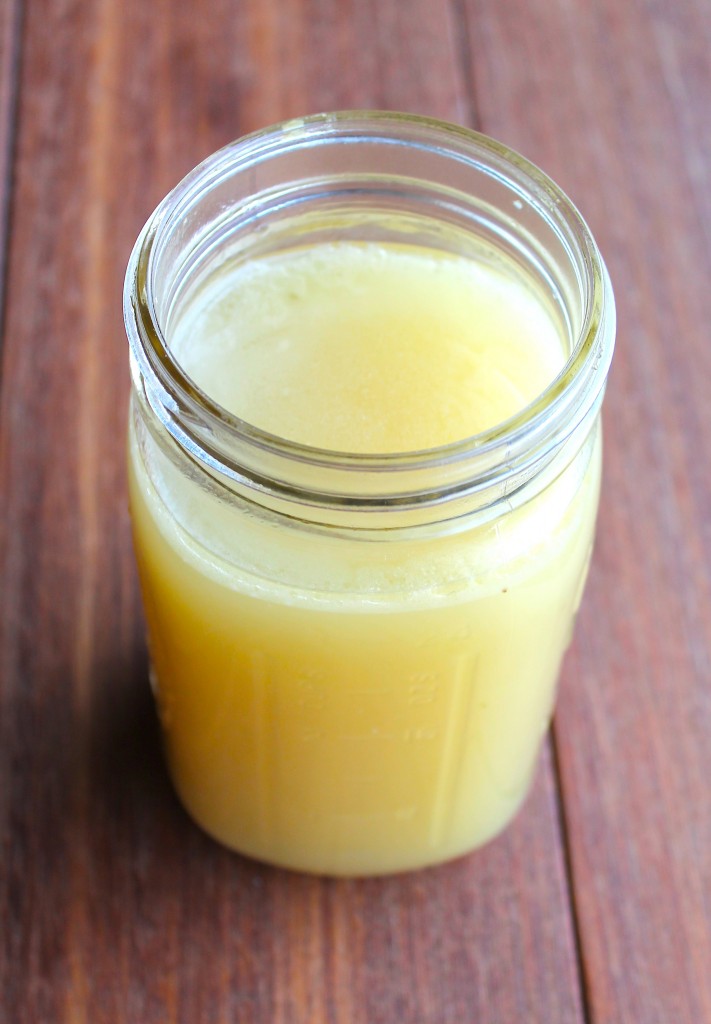
broth is beautiful.
How I Make Bone Broth
Once I got a lot of that type of feedback, I realized I had to write up a little tutorial. Everyone should get perfectly gelled broth every time they make it. Broth is a right, not a privilege! Maybe I’m being dramatic.
Please note that while there is a recipe below with actual measurements and instructions, I hope that you use it as a template. If you follow the general set of guidelines, you should achieve broth perfection with the freedom to make it your own.
I use a pressure cooker. I highly recommend purchasing one. Links to options are below. If you aren’t interested in using a pressure cooker, the following recipe can still be used. You’ll just be simmering your broth for up to 24 hours instead or 1-2. Not a problem if you’re more patient than I am.
I make my bone broth in 2 phases: the bone phase and the veggie phase. This makes the process a bit longer, but it’s worth it. I do this for two reasons:
- I don’t like cooking the veggies for as long as the bones. They might make the broth bitter if cooked for so long. I don’t have scientific evidence to back this up, but I’m going with it. Plus, I tend to be a bit obsessive when it comes to things cooking as long as they should. If bones take 24 hours to fall apart when cooked slowly, and vegetables only an hour, it just doesn’t make sense to me to cook them for equal time.
- Less is more. When you reduce, that is. I leave the lid off during phase 2, and allow the broth to reduce, which makes it perfectly concentrated. I’m willing to bet that most bone broth woes can be solved simply by using less water. You want it to be rich and concentrated. You can always dilute it later if you’d like, depending on how you’re using it.
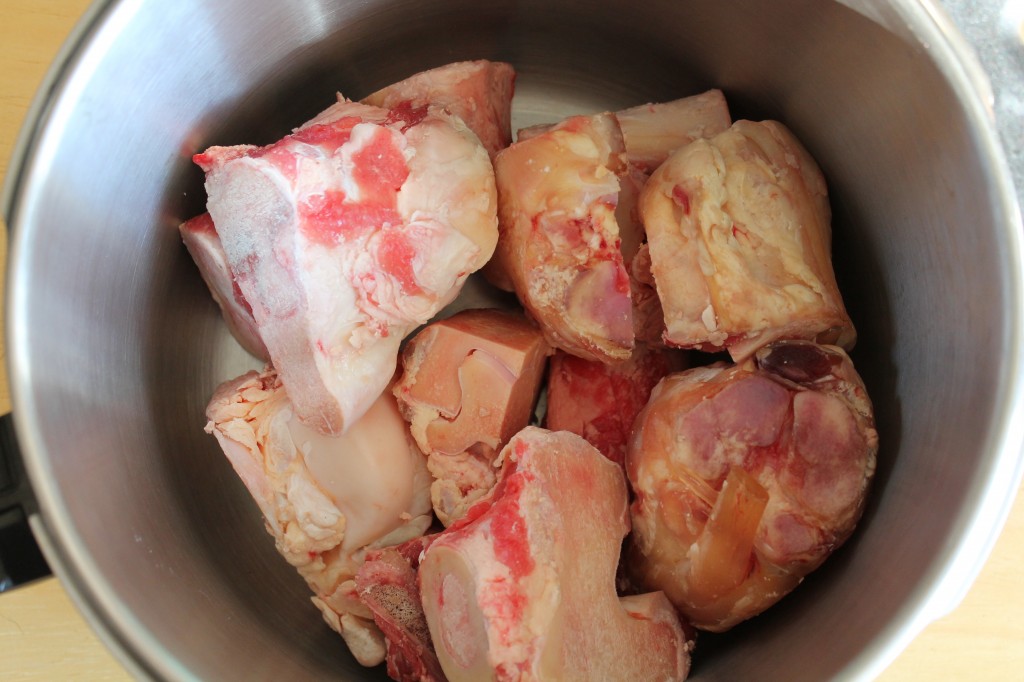
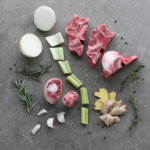
As far as what kind of bones: the ones with joints are best; knuckle bones are good, as are chicken backs and necks. Wings are also a good option. You can save your bones from when you make chicken and use those as well. Get the best quality you can- grass fed beef and pastured chicken if you can. You want healthy bones for your broth!
Here’s how I cook it in a stove top pressure cooker: (note, I’ve since switched to an electric pressure cooker, but the method is the same)
Into my pressure cooker go several pounds bones; beef, lamb, or chicken. I fill the pot about half way with bones and cover with water by a few inches.
 See that line inside the pressure cooker that says MAX? Respect that. I bring my water line a bit below, just to be safe.
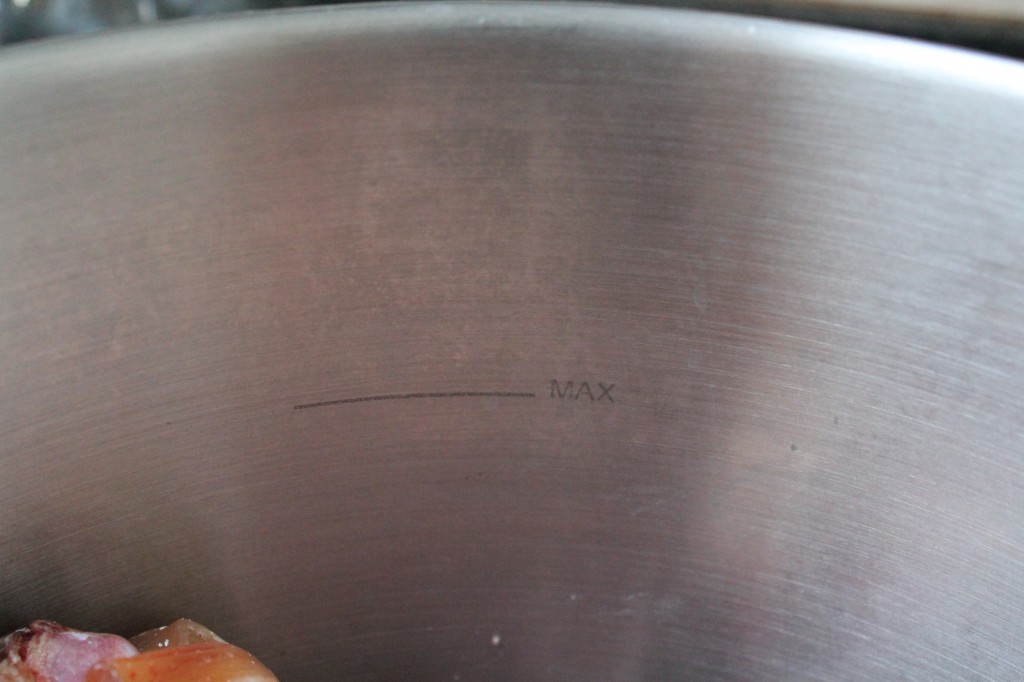 Into the pot goes 1 tablespoon apple cider vinegar.
 And 1-2 teaspoons sea salt
Throw in some peppercorns too! And then it’s time to let the stars of the show do their thing. Cook according to the instructions below, depending on the bones and method you’re using.
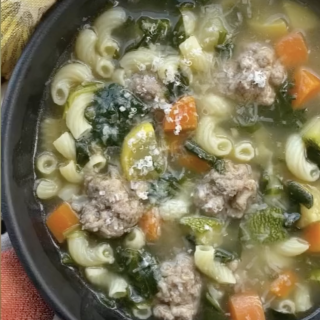
After that: Time for phase 2. Add your veggies. These don’t have to be beautiful, in fact, they shouldn’t be. Save your scraps and freeze them- they’re perfect for broth making. I like lots of root vegetables like carrots, parsnips and celery root. I also add an onion, cut in quarters, (you don’t have to peel it), some garlic cloves, and some herbs.
Remember, this isn’t an exact recipe. You can add anything that you’d like the flavor of in your broth. I do, however, recommend keeping it somewhat simple.
Add your veggies, and turn the heat back up to high. Once it comes to a boil, turn it down so it stays at a good simmer. Let the broth reduce for at least an hour.
Strain the broth over another large pot with a strainer in it. Squish the contents of the strainer with a wooden spoon or ladle so you get as much juice out of it as possible. You can save the carrots or any other veggies you want to add back in for soup.
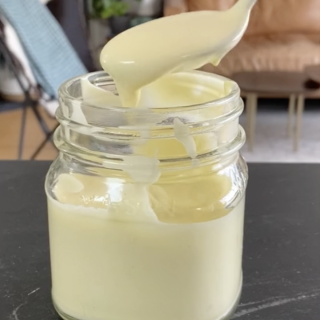
Transfer the broth to glass jars or containers and chill in the fridge. The fat will be easy to remove once the broth is cold.
If you want to be a showoff, Turn your broth out onto a cutting board and cut it with a knife. Why? Just because you can.

So there you have it; how I make bone broth. I hope it results in broth perfection for you.
Pressure Cooker Shopping:
6-in-1 Instant Pot (Pressure Cooker, Slow Cooker, Rice Cooker, Sauté/Browning, Steamer & Warmer)
7-in-1 Instant Pot (Pressure Cooker, Slow Cooker, Rice Cooker, Sauté/Browning, Yogurt Maker, Steamer & Warmer)
How to pick the size? If you plan on making lots of bone broth, I recommend the 8 quart, but you can still make a good batch of concentrated broth in the 6 quart.
6-in-1 or 7-in-1? Plan on making yogurt? Get the 7-in-1. Nope? The 6-in-1 is all you need!
Rather kick it old school and get a stove top pressure cooker? Here’s a great 6 quart one and the same model in the 10 quart version.
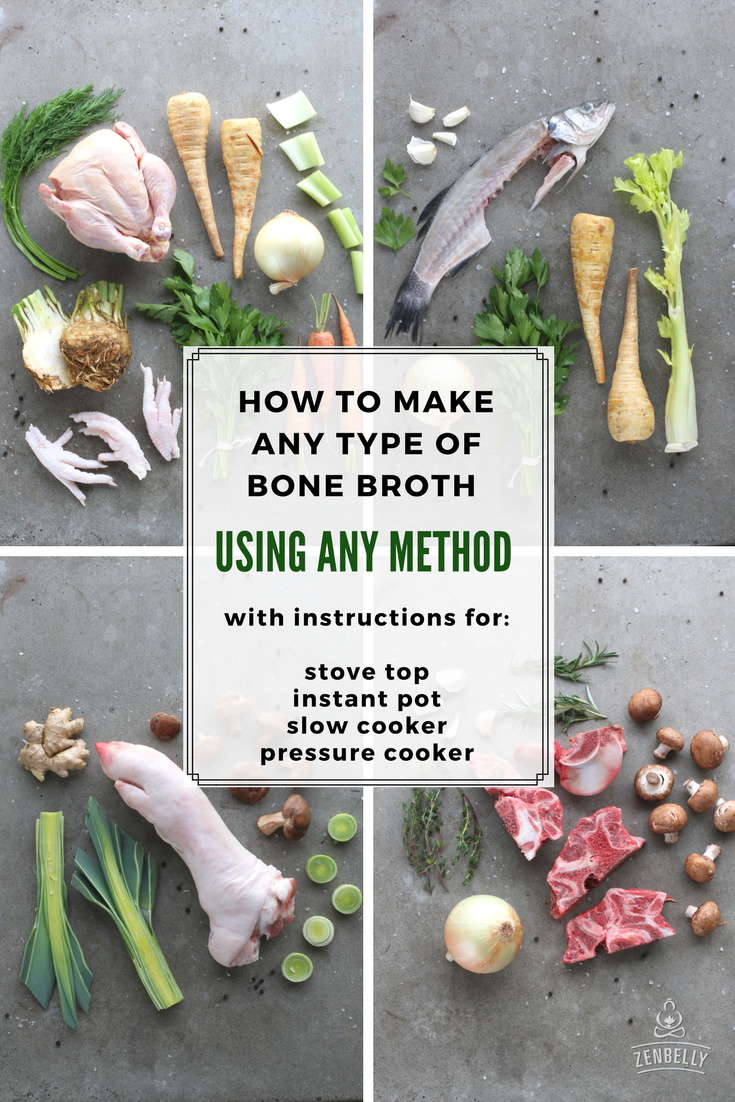
And if you want super specific recipes for all sorts of broth, you’ll find them all in my cookbook; Paleo Soups & Stews!
PrintBone Broth
use this basic method to make any type of broth.
- Yield: 2 quarts
Ingredients
- 4 pounds beef, chicken, pork, or lamb bones ((or a combination))
- 2 tablespoons apple cider vinegar
- 2 teaspoons sea salt
- 10–12 black peppercorns
- 1 large onion, (unpeeled and quartered)
- 2 pounds hearty / root vegetables, such as carrot, celery, celery root, parsnip (roughly chopped)
- 6–8 cloves garlic (unpeeled)
- 2 sprigs fresh herbs ((such as rosemary, thyme, parsley, dill, or a combination, depending on the flavor profile you’re going for))
Instructions
If using a stock pot:
- Add the bones, apple cider vinegar, salt, and peppercorns to a large stock pot. Add about 3 quarts of cool filtered water, or just enough to cover the bones by a couple of inches.
- Bring to a boil and cook, uncovered, for 10 minutes. Skim off and discard any scum that has risen to the top.
- Reduce the heat to low and simmer, covered, for 2 hours for chicken and at least 4 hours for beef, lamb or pork.
- Add the remaining ingredients and bring to a boil. Cook, uncovered, for 1 hour, or until the liquid has reduced by about one-quarter.
- Use a fine-mesh strainer to strain the broth, pressing as much liquid from the bones and vegetable as possible before discarding them. Store the broth in a glass jar in the refrigerator for up to 1 week, or in the freezer for up to 1 year.
If using a pressure cooker / Instant Pot or other multi-cooker
- Add the bones, apple cider vinegar, salt, and peppercorns to a large stock pot. Add about 2-3 quarts of cool filtered water, or just enough to cover the bones by a couple of inches.
- Secure the lid and cook on high pressure for 1 hour for chicken, or 90 minutes for beef, lamb, or pork bones.
- After the time is up, allow the pressure to release naturally for 10 minutes before turning the valve to venting and allowing the remaining pressure to release.
- Add the remaining ingredients and set the Instant Pot to sauté (or bring to a boil if using a stove top pressure cooker) Cook, uncovered, for 1 hour, or until the liquid has reduced by about one-quarter.
- Use a fine-mesh strainer to strain the broth, pressing as much liquid from the bones and vegetable as possible before discarding them. Store the broth in a glass jar in the refrigerator for up to 1 week, or in the freezer for up to 1 year.
If using a slow cooker:
- Place all of the ingredients into the insert of a slow cooker and cover with about 2 quarts of cool filtered water. Cook on low for 8-10 hours for chicken, and up to 24 for beef, pork, or lamb bones.
- Use a fine-mesh strainer to strain the broth, pressing as much liquid from the bones and vegetable as possible before discarding them. Store the broth in a glass jar in the refrigerator for up to 1 week, or in the freezer for up to 1 year.
All of the links on zenbelly.com are for information purposes, however some are affiliate links to books, products or services. Any sponsored posts are clearly labelled as being sponsored content. Some ads on this site are served by ad networks and the advertised products are not necessarily recommended by Zenbelly.

Crystal says
When you say several pounds, do you mean more than 3 pounds? I just ordered a pressure cooker similar to yours and want to make sure I get it right. Thank you for sharing!
zenbellyblog says
it’s not at all an exact recipe, so you can use as many pounds as you have. The thing to keep in mind is the bones to water ratio; I’ve found that when I bring the water to two inches or so above the bones, it works out really well. I’ve made many different size batches (some giant, for catering purposes) and have had good luck with that general ratio…. And if I were to guess (which is all I can do that the moment, since I’m currently about 3000 miles from my freezer!) I’d say that my average bag of bones is 4-5 pounds. You can also do a lot of correcting when you reduce; if it seems weak, reducing will really concentrate it! And if it’s too strong when it’s done, you can add water as needed. I hope that helps!
Tamara Tomczak says
may be a silly question but… do you leave the lid off when you reduce?
zenbellyblog says
Not silly. Yes, lid off for reducing. You want some of the liquid to evaporate, and get a bit more concentrated.
kitchen_rookie says
I’m in love with your squared measuring spoons. Where did you get them?
zenbellyblog says
I think I got them at Bed Bath and Beyond, but I bet you could find them at Williams Sonoma too. They fit in spice bottles! 😀
kitchen_rookie says
I finally went to BB&B last weekend and got myself the “spice” measuring spoons. They’re fantastic! I’m slowly building my kitchen arsenal. One of my favorite kitchen purchases to date. Thanks for the tip.
Linda Allasia says
I got mine at William Sonoma. And yes, they are fabulous for getting into spice jars!
Alex says
May I ask when and where you purchased your Fagor Duo 10-qt pressure cooker and canner?
http://www.amazon.com/Fagor-10-Quart-Pressure-Cooker-Canner/dp/B0000CFH7X
Thanks in advance.
zenbellyblog says
I bought mine at Macy’s. I’m not sure if the one I have is available online, but it looks like there are similar ones if the exact one isn’t there…
Nedra says
That broth sounds wonderful but is much thicker than any I have seen. How do you eat it?
zenbellyblog says
It’s only thick like that when it’s cold. The gelatin melts when you heat it.
Debra says
Yours is the first recipe I’ve followed that has actually gelled! On my first attempt, when I saw it in all it’s solid glory, I exclaimed, “Yay! I did it!” My 17 yo son took one look at the gelatinous form and said, “That’s disgusting.” I felt victorious! It’s the reducing that does the trick, I think. Tastes great! Thanks!
zenbellyblog says
haha, what he doesn’t like meat jello?! 😉 I’m so glad I could help you achieve a victory in your kitchen!
Jessi says
THANK YOU THANK YOU! I have tried various bone broth recipes that relied on slow cooking for 24 hours and I didn’t find them palatable. Not sure what it was but every time I have done it there was an odd bitter flavor. I followed your post this time around and I am happy to report that I finally was able to create not only a “palatable broth” but THE best broth I have ever had. Thank you! Your post on broth was what lead me to your blog and after this great success you have a loyal reader!
zenbellyblog says
Yay! I’m so glad to hear it! Thanks Jessi, I’m happy to have you as a loyal reader 🙂
Nick says
Haha I dont my broth will make it through to the end of phase 2, absolutely amazing! thank you!!
Kate says
I followed your recipe for my very first attempt at bone broth soup. I am happy to report that it turned out perfect! Thank you so much for sharing. I did do some internet research before I selected your recipe. Yours made the most sense and I am glad that I chose it!
zenbellyblog says
So glad to hear it! Thanks Kate!
dori says
Did you remove bones before adding the vegy’s? Ive been using the pressure cooker for this for a few years and LOVE IT. But I didn’t think about doing vegy’s separate, thought it was mostly for flavor. but will do it your way next time. I typically use my hands and squeeze the life out of any solid in the strainer so I can get every last drop. because of the carrots, herbs, etc. my broth is pretty colorful and cloudy ( : thank you
zenbellyblog says
I leave the bones in! So the last chunk of time is the bones and veggies, uncovered and reducing. The only exception is when I’m making a really large batch and need the room for more veggies.
Sabrina says
I’ve made bone broth a few times now and cannot get it to gel!! I don’t have a pressure cooker, but I brought to a boil and slow simmered it for 12+ hours. I used a whole chicken carcass and chicken feet with ACV and veggies, and nothing 🙁 I know it’s still full of minerals, but I’d like to have some gelatin!
Any tips for non pressure cooker BB? I used grocery bought organic chicken, not necessarily pastured.
Thank you 🙂
Christina says
I make chicken stock with leftover bones from roasted chickens all the time. I put everything (bones with some meat still on, skin, herbs, veggies, peppercorns) in a huge stock pot, fill it with water, bring it to a boil, and let it simmer uncovered for 6-10 hours. Before I go to bed, I take it off the stove and put it directly in the refrigerator, bones and all to sit at least overnight and up to 24 hours. Then the next day or so later, I reheat it to boiling, let it cool, and then strain it. Back in the fridge to chill again so I can skim off the rendered fat. I know it takes a little longer this way, but it ALWAYS gels up for me this way. Good luck!
Sue says
Can you give your thoughts…I have read in other places that it is best to roast beef bones first before making the stock…have you tried this? I often make stock with chicken carcasses, but have you ever used, say, a whole chicken? (cut into bits…) I have made that in the past, and simmered till the meat was mush, tasteless as anything (though the dog liked it…) and that was the best chicken broth ever….really want to try beef broth, though…
zenbellyblog says
Roasting bones will greatly add to the depth of flavor of the stock. I don’t think there’s much nutritional difference, but I’m no expert on the topic. If you’re going to be using the broth to make richly flavored soups or stews, or for a sauce such as a demi-glace, roasting is definitely the way to go. As far as chicken- I usually use just bones such as back and necks and feet, or leftover bones from roast chicken. But you can definitely throw a whole chicken in there! That’s the way I always saw it done growing up; My mom would just use whole raw chickens. But she didn’t simmer it as long as the WAPF / paleo method, so the meat on the chicken was salvageable for chicken salads, etc.
Chef Art says
Only thing I would suggest is a recipe for those without a pressure cooker.
zenbellyblog says
Then write one, silly, Notice the title of the post is “How *I* make bone broth”? There are a gazillion recipes out there for slow cooker broth. 😉
Kerri says
My beef bone-broth secret to jelly-full success = Oxtails. The leftover meat makes excellent stew and soup. Instagram http://instagram.com/p/gAolQPCPOJ/#
zenbellyblog says
oh yeah, oxtails are great! I made an incredible pho with them once. yum.
Megan says
Two Questions:
1. Do you store your broth in the fridge or freezer?
2. About how long is it good for?
Thanks!
zenbellyblog says
I do both, but it doesn’t often make it to the freezer! In the fridge, it should last about a week.
Chef Art says
Beef and veal stocks need to roasted first to get that depth of flavor. The vegies should be roasted also. Write one? Yeh in my spare time.
zenbellyblog says
um, yeah. exactly.
Holly says
Just got done doing part 1, did you water level increase? Mine did past the max line. Even though I was well under it before we started. I’m a little concerned.
zenbellyblog says
You water level increased?! That’s so odd. Could have been how the bones cooked down and settled in the pot… But if you’re at the point where you’re ready to reduce the broth, it’s okay if the liquid level is above the max line; the “max” only applies to when you’re cooking with pressure.
Lexi says
This actually happened to me as well! I think there was so much fat in the joints that it rendered causing the liquid to rise.
kaizenneenera Rottman says
I cannot thank you enough for this recipe!! I have tried batch after batch with another recipe after another recipe and my sad little broth was always liquified. I was so happy to find yours and tried it yesterday with GREAT SUCCESS! My fridge is now stocked with a nice hearty batch of meat jello. I feel like I’ve been inducted into a whole new special bone broth club. Thank you!
truenexus2014 says
I’ve been looking for days for this recipe. It should be the first entry in googling ‘pressure cooker bone stock broth recipe’. My Q? is, does cracking the bones, before processing, do anything good, bad, or special?
zenbellyblog says
I have no idea!
bob says
Cracking the bones makes the insides of the bones more available for the nutrition to be imparted into the broth. So if the bones are already cut across the marrow, then you don’t need to crack them. If the bones are whole, then you can crack them if you like.
Tracy H. says
What about the fat? Can one use that fat off the top of the cooled broth for cooking veggies, say? I’m about to make lamb broth and anticipating there will be fat, maybe a lot.
zenbellyblog says
You can use it, but according to Sally Fallon, the fat has been cooked for so long that it’s no longer nutrient dense, and might even fall into the damaged fats category. Personally, I’d probably still use it, and wouldn’t worry too much about it- lots of flavor in there!
hallucigenia says
I don’t know what nutrients Fallon thinks might disappear after long cooking, but animal fats are entirely undamaged at a home pressure cooker’s 250F/120C: http://www.clovegarden.com/ingred/oilchart.html
zenbellyblog says
Interesting. Good to know, thanks!
Chef Art says
That layer of fat on top of say chicken stock is called smoltz. A delicacy especially if it’s coming from pastured chickens.
zenbellyblog says
Oh yes. Lovely stuff. But is it usually cooked for that long / hot, as it is when making broth? I have no idea how it’s usually rendered, do you?
Chef Art says
When you cool in in the frig the fat will rise to the top. Just pick it up 🙂
zenbellyblog says
No, I know that, silly. I’m wondering if schmaltz is usually rendered by making broth, or if there’s a different method that doesn’t cook the hell out of it, like making broth does.
PrimalMex (@rspeedygo) says
Thanks for the step by step illustration! I know see I use too much water and not enough bones! I am determined to get my broth to gel!!
BKC says
If you were going to make a cup of broth to drink, would you just heat up some the the gelled stock or would you dilute it with some water?
zenbellyblog says
It depends on how concentrated it is, and how you want it to taste. Mine are usually strong enough that I like to add about 1 part water to 3-4 parts broth. And a pinch of sea salt 🙂
Melissa B says
I just found your site a few days ago and am currently on stage one. The first broth I tried to make I only had marrow bones, and it ended up bitter, not gelled, and no wonder! No cartilage! So, in the trash it went. Hoping to get the gel this time and a deep beef flavor with ox tail and veggies in during the concentrating stage. I am so excited to have the nutrient dense cup of broth to help this mama feel better! 1st trimester pregnancy is not fun in this house at all!
Melissa B says
Ox tail have been in the entire time, veggies in with stage 2.
Mar says
I made a delicious Pho broth yesterday and was wondering if the already cooked bones have any nutritional value left in them? I was thinking of recooking with them to make another broth before tossing them.
Barbara says
Hi Mar-
I haven’t done it myself – still new to this – but several sources I’ve read have mentioned re-using the bones multiple times for the mineral content – almost until they’re SOFT before discarding them. The broths get thinner but still have a lot of mineral content, so probably not as tasty for sipping, but some value for nutrition to add to a dish instead of water.
Alex says
I much prefer making stock in a pressure cooker. However, with respect to adding an acid, my own preference is some fresh squeezed lemon or lime juice, because to my palate, vinegar dominates everything it touches.
donna brooks says
You said, “the fat will be easy to remove once chilled”…so do you then skim off the fat? Or is the fat part of the broths goodness? Thanks!
zenbellyblog says
I skim off the fat, but wait until I’m ready to eat the broth. You can leave a little of the fat, depending on how you plan on using the broth, but if you leave it all, it will most likely be really fatty / greasy.
jennyquack says
Just had to tell you…I made my first ever batch this week in my pressure cooker. It did not gel, but then I reduced it like you do and then it gelled! Is it weird that made me so happy? I made roasted butternut squash soup with it tonight…ah-mazing!
zenbellyblog says
not weird at all- Good broth is definitely reason for celebration! 🙂
Peter says
Being of polish Lithuanian heritage we have always made jelly, but we use pigs feet. I have used a pressure cooker for many years to save on fuel bills. You can’ t fail to make perfect jelly with pigs feet, just pop in a bay leaf or two and seasoning of choice. I eat it sliced with a little vinegar and ( naughtily) occasionally use the fat on the surface instead of butter on my toast ( only very occasionally )
zenbellyblog says
I love using pigs feet for broth! And I’ve got no problems with fat on toast 😉
Helen says
That jell is beautiful!!!! I love it and hope mine turns out that way. I have had friends freak out about the jell and I tell them it is perfect but they don’t get it…This is my first time with a pressure cooker and I’m sure it will be great. Thanks for your info:)
Smart enough to know better says
Just here from a false advertisement online to see if Simone ever admits the broth was CLEARLY frozen. You could literally see ice crystals and fingerprints in the frost on the frozen glass.
I wonder how bad her broth actually is if she has to literally lie about it.
zenbelly says
haha omg you created a fake profile to troll my blog and spew bullshit false accusations about me and my food, I hope you get the help you so clearly need. Also, dumbfuck: Fingerprints happen on condensation from the fridge, too – maybe Smart Enough To Know Better isn’t the best ID for ya. Jesus, who hurt you?
Angelique says
I found your reel on Instagram
I’ve never found a recipe that celebrated the gelling of broth.
I’m so going to try your slow cooker method. I don’t have a pressure cooker but now I want one.
I do have a question about adding the veggies at the beginning of the slow cooker recipe. Should I hold off adding the veggies until later? I think you might be right that cooking them for so long might make the broth bitter.
zenbelly says
Hi Angelique! Welcome 🙂 If using a slow cooker, you can definitely still add the veggies later on. I would turn it up to high so you get a little big of reduction as well.
M says
Homemade stock and broth should look like meat jello. You can always dilute it.
Also don’t add much salt at all before it’s completely reduced down where you want it, or it will get super salty.
A few months agoI cooked a bone in pork shoulder in my pressure cooker for Eastern NC style shredded pork. I’m allergic to apples so I used a combination of white balsamic, white wine vinegar, and rice vinegar. I also added hickory smoked black pepper, Texas Pete pepper sauce, and crushed red pepper flakes to infuse the meat with the Eastern NC style mop sauce (it’s a pepper vinegar sauce with absolutely no ketchup).
The little bit of vinegar and pepper made the broth so damn delicious. When I would microwave the leftovers I would drink all the liquid that came out of the pork.
So I’ve been making pork bone broth with a little bit of Texas Pete and pepper flakes and the hardwood smoked black pepper which added a nice smokey flavor. I don’t like spicy stuff, but a little bit of red pepper makes stuff taste so good, like the Texas Pete brine on Bojangles fried chicken.
The vinegar and slight heat from the peppers makes the broth so delicious you crave it. Usually I have to add saltines or noodles to enjoy broth, and I add powdered bouillon to make it more concentrated in flavor,
My local grocery store sells trotters (pig feet) and fresh hocks which are perfect for the bone broth.
Dee Lynn says
I have made bone broth 100 times and it has NEVER turned out like this. Thank you so much for sharing your process, I followed exactly exactly and was able to turn out a bone broth mould!
Sue says
I simmer my bone broth for 48 hours. Right through the night. The color deepens and the gelatin is fantastic!